I recently setup a backend RDP server so that I could test our remote services. I went through the installation process and installed my RDP license on the server successfully.
The problem was that I was not getting an error when logging onto the server locally to check the status of the RDP Server :
I also had Events within Event Viewer:
Log Name: System
Source: Microsoft-Windows-TerminalServices-Licensing
Date: 24/03/2021 3:44:16 PM
Event ID: 56
Task Category: None
Level: Warning
Keywords: Classic
User: N/A
Computer: SRV2019
Description:
The Remote Desktop license server “SRV2019” has not been activated and therefore will only issue temporary licenses. To issue permanent licenses, the Remote Desktop license server must be activated.
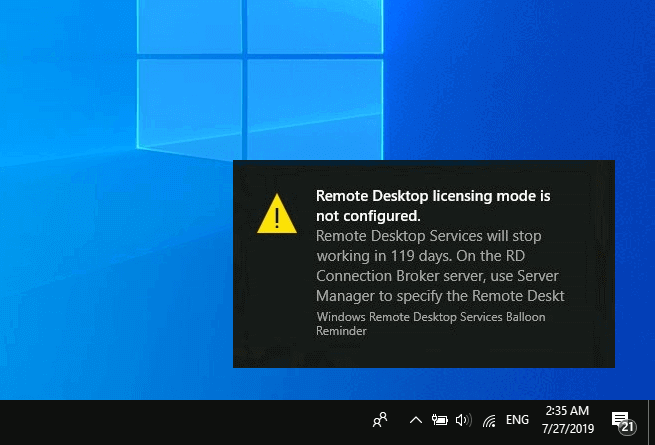
Usually, this error appears as a notification popup in the bottom right-hand corner of the screen saying:
I thought I had this set properly, but the RDP Licensing Diagnoser application told met hat I needed to choose the licensing configuration to distribute for Per Device OR Per User. The licenses I installed were per user so I did some research.
I found out that this had to be configured via the Registry, PowerShell, or could be configured through GPO.
How to set RDP Server licence mode in Windows Server 2016 and 2019.
To change the licensing mode for Remote Desktop session host using the registry editor and get rid of the error message Remote Desktop Services will stop working in xxx days:
At first, press Windows + R keys together and then type regedit in the Run dialog box and press Enter key.

Next, in the left pane of the Registry Editor, navigate to the following registry key:
HKLM\SYSTEM\CurrentControlSet\Control\Terminal Server\RCM\Licensing Core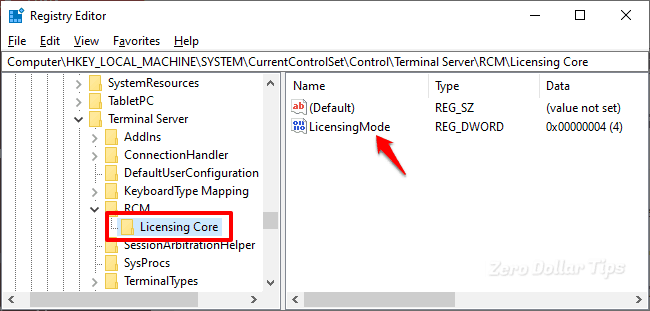
In the right pane, double-click on the LicensingMode to edit its value and then change the Value data according to your requirement:
Set the Value data 2 for Per Device RDS licensing mode.
Set the Value data 4 for Per User RDS licensing mode.

Last, click on the OK button to save the changes.
Restart your computer and check if the Remote Desktop licensing mode is configured and the issue on Windows Server has been resolved.
Once you changed the licensing mode, now everything will be reported accurately and the Remote Desktop session host will recognize the licensing configuration.
How To configure the Remote Desktop Licensing Mode through a Group Policy Object (GPO)
Logon in to the machines that has Group Policy Tools Installed, press Windows + R keys together, type gpedit.msc.

Within Group Policy Editor, create a new GPO and link it to the level that you need to link it to.
Navigate to:
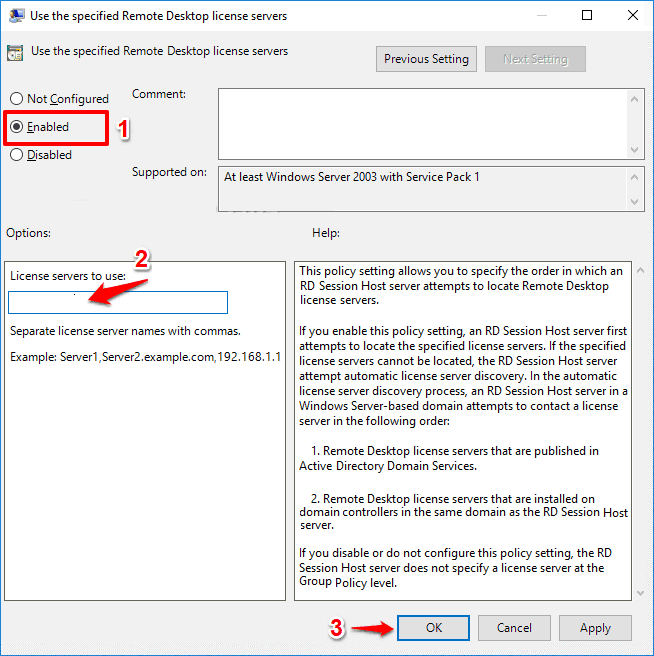
Computer Configuration > Policies > Administrative Templates > Windows Components > Remote Desktop Services > Remote Desktop Session Host > Licensing.

Double-click on the “Use the specified Remote Desktop license servers” setting and then select Enabled option. Finally, enter the names of the license servers (host name or IP address) and then click on the OK button.
Similarly, double-click on the “Set the Remote Desktop licensing mode” setting and then select Enabled option. Finally, set the licensing mode (Per Device or Per User) and then click on the OK button.

Once all these changes are done, close Group Policy Editor, go to the RDP Licensing Server and run a gpupdate /force to refresh Group Policy.
Now, when you open the Remote Desktop Licensing Diagnoser, you shouldn’t see any errors like the remote desktop licensing mode is not configured on windows server or any kind of issues regarding your licenses.
How To configure Remote Desktop Licensing Mode through PowerShell.
You can also use PowerShell to set the Licensing Mode via the Set-RDLicenseConfiguration cmdlet from the RemoteDesktop PowerShell Module which is installed with Remote Desktop Services:
Import-Module remotedesktop
Set-RDLicenseConfiguration -LicenseServer @("srv2019.local","srv2019.local") -Mode PerUser -ConnectionBroker "srv20119.local"
Recent Comments